How to Install Wet Underfloor Heating (Full Step-by-Step Guide)
How to Install Wet Underfloor Heating: Complete Step-by-Step Guide
If you are considering installing wet underfloor heating in your home, it’s beneficial to understand the steps involved. In this guide, we explain how to install wet underfloor heating and highlight the key considerations at each stage. Wet UFH can be installed in most homes, with the installation method depending on your situation. We’ll cover the different installation steps for each method, including screed, in-joist, and overlay systems.
Wet Underfloor Heating Installation – At a Glance
Subfloor type differences
UFH installation varies depending on the project. However, the core principles remain the same. Each method uses a different way of securing the pipe, typically depending on whether the installation is for a new build or a retrofit.
Typical installation time
Installation takes 1–2 days for smaller systems and up to one week for larger or more complex installs.
Key steps
Subfloor preparation, placing insulation, installing fixing systems, laying pipework, connection to the manifold, pressure testing, screeding, and installing floor coverings.
Tools required
Pipe reamer, pipe cutter, and basic plumbing tools.
Additional tools that can be beneficial including a pipe decoiler and staple gun.
Basic cost bands
Small systems: £1,000 – £2,000
Medium systems: £2,000 – £4,000
Larger or complex systems: £4,000+
Costs vary depending on system type, floor construction, and preparation requirements.
When professional installation is recommended
Much of the installation can be completed by a competent DIYer. Connection to the heat source should be carried out by a qualified heating engineer, and all electrical wiring is best left to a qualified electrician.
What You Need Before Installing Wet UFH
The first step is to decide which areas will be heated by UFH. The size of the project will affect installation cost and time. Next you need to determine the correct UFH installation method for your project. This will affect the preparation, materials, and installation steps.
Ensure your insulation is up to standard to reduce heating costs and improve energy efficiency. This goes hand in hand with a heat loss calculation. This allows you to ensure your heat demand is met by the system.
A quality pipe layout plan is also extremely beneficial, making wet UFH pipe installation easier. Some experienced professionals may suggest adjustments, however, having a professional design is highly recommended. This provides an installation guide and data such as heat output and flow rates. Compare this with your heat loss survey to ensure the system will adequately heat your home.
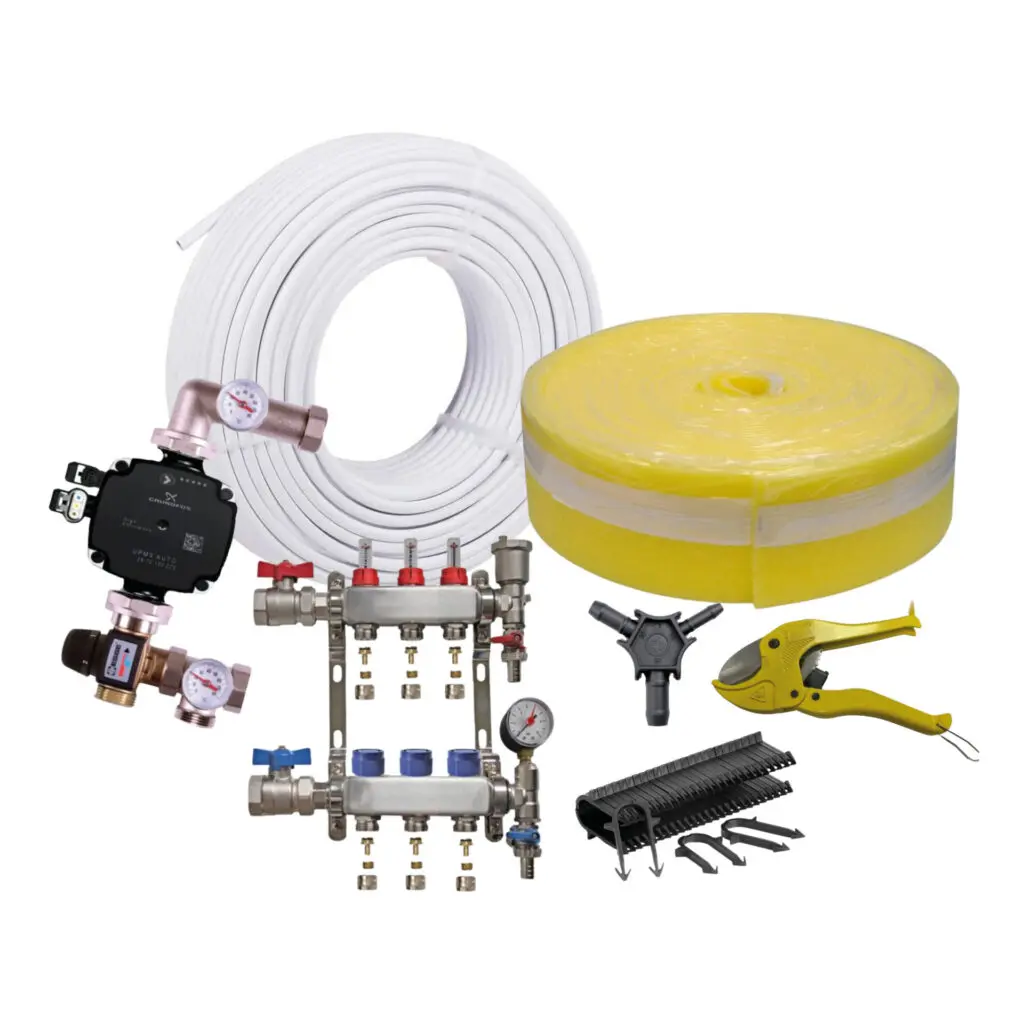
Finally you need the materials, here’s a rough guide of everything you need. A full list of materials can be found on our wet UFH buying guide. Don’t forget additional materials such as insulation & screed.
Wet UFH materials: Manifold, pump, pipe, installation-specific components (overlay boards, spreader plates, staples)
Tools: Pipe reamer and pipe cutters are essential. Spanners are also required. A pipe decoiler and staple gun are recommended.
System controls: Thermostats, wiring centre, actuators, WiFi hub
How Wet Underfloor Heating Works
Wet underfloor heating works by circulating heated water through pipes beneath the floor. Installed within a screed, between joists, or on top of an existing floor, the system provides even heat from the ground up.
How to Install Wet Underfloor Heating (Step-by-Step)
Installing wet UFH follows the same principle regardless of system type. Each method requires specific materials to hold the pipe correctly.
Step 1 – Prepare and Clean the Subfloor
Preparation of the subfloor is the first step when installing wet underfloor heating. Ensure the subfloor is clear of debris and dust. If installing on or between joists, these should be checked to ensure they are in good condition. Any damage must be repaired before work commences. When installing wet overlay systems, subfloor preparation is critical. Wooden floorboards should be securely fixed, and uneven areas levelled using a self-levelling compound. Solid concrete floors must be level and free of dust.
Step 2 – Lay Insulation and Edge Strip
Installing insulation and edge strip is a key step for screed systems. PIR insulation (or similar) limits downward heat loss, while edge strip creates an expansion gap around the perimeter of the heated area. When installing wet UFH between joists, insulation is required at the bottom of the joist below the pipes. Rigid PIR is often used, with insulation wool pressed tightly against the pipe. This reduces downward heat loss and improves system efficiency. With overlay systems, the UFH boards are made from insulation.
Step 3 – Install the Manifold
The manifold should be positioned centrally within the property to allow efficient distribution to each heated area and minimise long pipe runs. Ensure copper pipework from the boiler can reach the chosen manifold location. Mount the manifold on the wall using suitably rated fixings and raw plugs, ensuring the specified installation clearances are met. Ensure all fittings are correctly threaded and securely tightened.
Step 4 – Install the Fixing System
This step involves installing the fixings that hold the pipe in place. Clip rails or castellated panels are positioned on the subfloor to secure the pipe correctly. If using staples, these are installed as the pipe is laid. Overlay boards and spreader plates are also installed at this stage, before the pipe is placed. Overlay boards are fixed using spray adhesive or screws, while spreader plates are typically fixed with nails. Always follow the pipe layout, as the fixing system determines where the pipes are held.
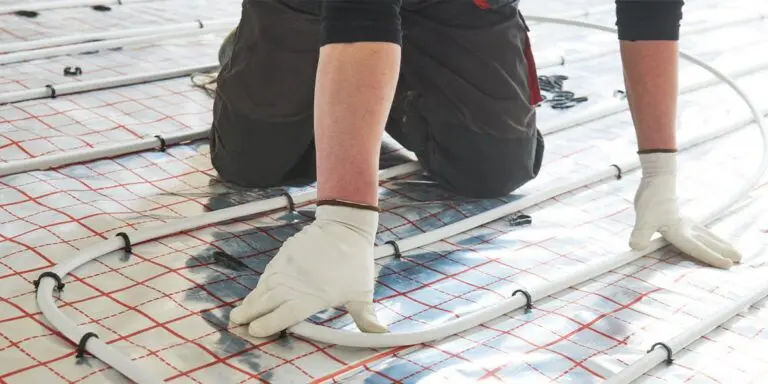
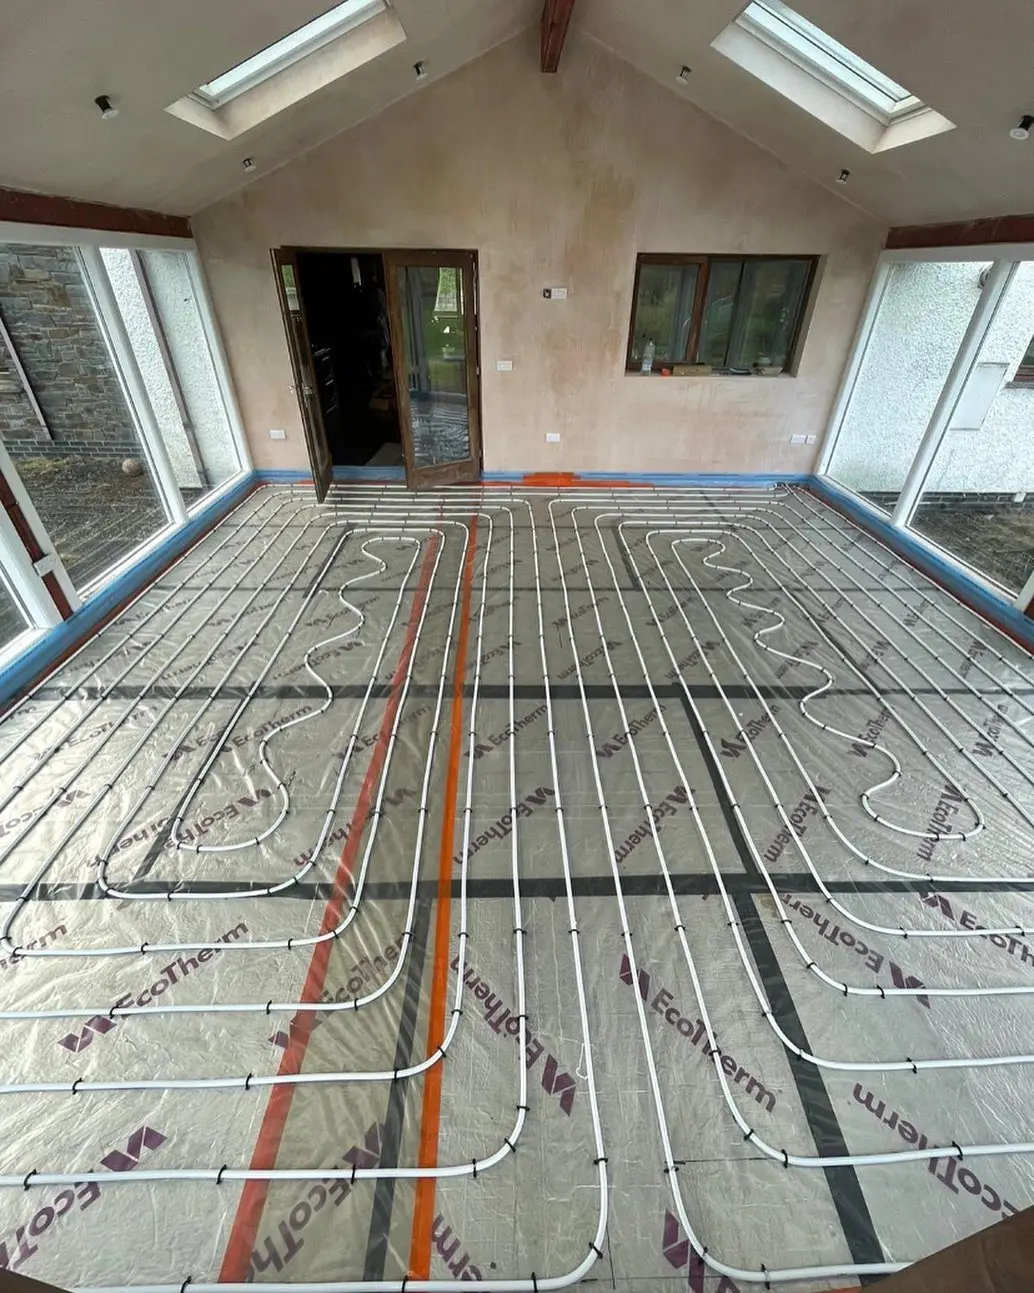
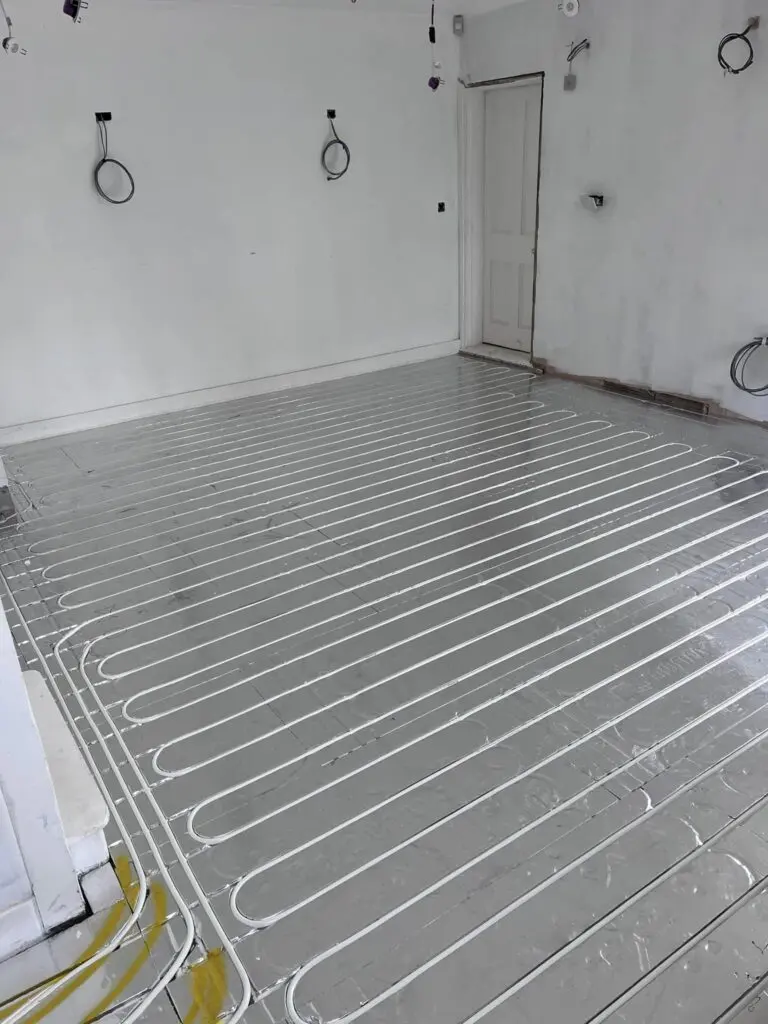
Step 5 – Lay the UFH Pipework
Lay the pipework in accordance with the layout drawing. If using staples, these are pushed into the insulation beneath the pipe. Care must be taken with pipe spacing to ensure even heat distribution and avoid cold spots.
Pre-grooved overlay boards and spreader plates hold the pipe in place. The pipe can be pushed into the channels using the sole of your foot.
Take extra care not to damage the pipe by forcing bends, as this may cause kinks. Turns should be formed by encouraging the pipe gently, keeping hands wide apart and holding the pipe down with your foot.
Step 6 – Connect Pipework to the Manifold
Connect the UFH pipework to the manifold using eurocone fittings. Ensure the pipe ends are cut square and fully inserted into the fitting before tightening. Compression nuts should be tightened firmly but not overtightened. Each pipe loop should be clearly identified and connected to the correct flow and return ports on the manifold.
Step 7 – Pressure Test the UFH System
Filling, venting, and pressure testing in essential when installing water udnder4floor heating. This is to ensure the system has been assembled correctly before screed or floor coverings are installed. Increase the system pressure to a maximum of 6 bar. The pipes will expand, causing a slight pressure drop, which should stabilise. Monitor the pressure gauge to ensure it remains constant. Leave the system under pressure for at least 24 hours. Further filling and testing details can be found here.

Step 8 – Pour Screed or Install Floor Decking
- Pouring screed can be complex and is often best left to a builder or installer. The screed type and thickness must be correct. Ensure the screed has fully cured before turning the system on.
- When installing UFH between joists, floorboards are laid on top. Take care when screwing boards down to avoid damaging the pipes.
- Overlay systems may require an intermediate layer before installing final floor coverings. Refer to the installation manual for further details.
Step 9 – Connect Controls and Commission the System
Thermostats, controls, and pumps often require a mains electrical connection. It is recommended that an electrician carries out this work. Label loops clearly to ensure correct operation when installing thermostats. This ensures each loop corresponds to the correct zone thermostat.
Installation Scenarios
we’ve highlights a few key considerations when installing a spefic system.
Installing Water UFH
in a Screed
- Installing UFH within a screed during the building phase is often easier as there is less disruption.
- Ensure all works, such as plumbing and electrical points, are completed beforehand. Features such as kitchen islands may require power, so any relevant work must be carried out prior to screeding.
- Screed type and thickness will affect curing time, make sure this is discussed with your screeding company.
- Screed should be poured with the system under pressure, as this prevents deformation of the pipes.
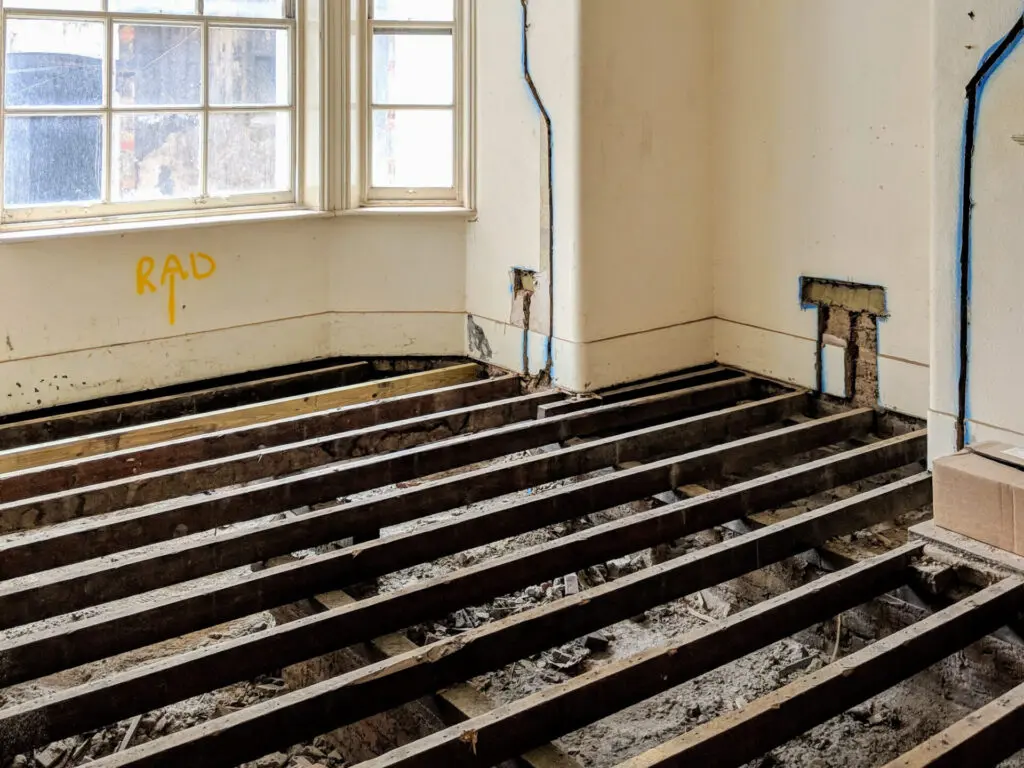
Installing Water UFH Between Joists
- Various methods can be used, including spreader plates, in-joist panels, and dry screed systems.
- Limit air pockets by filling voids with dry screed or insulation wool to improve heat transfer.
- Joists may require notching; always follow building regulations to ensure joist integrity is not compromised.
- Two pipe runs require a notch at one end, while three runs require a top and bottom notch.
- Measure joist spacing carefully. The most common spacing is 400mm, though this may vary in older properties.
Installing Water UFH
on an Existing Floor
- Installing water UFH on an existing concrete or wooden floor removes the need to lift the floor and can be more achievable for DIY, especially in smaller rooms.
- Subfloor preparation is critical to ensure it is clean and free from dust and debris.
- Door heights and skirting boards need to be raised by at least 20mm.
- Final floor height should be checked carefully before installation.
How Much Does It Cost to Install Wet Underfloor Heating?
We’ve included rough wet underfloor heating installation costs based on feedback from our trade customers. These figures are a general guide, and prices may vary depending on location and project complexity.
- Average screed installation: £1,000 – £3,000
- Average overlay or between-joist system: £2,000 – £4,000
Additional costs for screed, insulation, and preparation may be charged by the installer. The best way to obtain an accurate estimate is to request a quotation from an installer based on your specific project requirements.
Wet UFH Installation Tips & Common Mistakes to Avoid
Pipe bends too tight – Ensure the bending radius is not too small. Pipe ends can be laid in a lightbulb-shaped turn to reduce stress and minimise the risk of kinking.
Poor manifold location – The manifold should be centrally located within the heated area to reduce pipe run lengths and improve efficiency. Larger projects may require multiple manifold locations.
Final floor height – Regularly check floor heights to ensure compatibility with the intended finished floor. This is particularly important when considering insulation and screed thickness.
Pressure testing – Always fill and pressure test the system to ensure there are no leaks. This must be done before screed or flooring is installed.
Should You Install Wet Underfloor Heating Yourself?
Installing wet UFH can be completed by a competent DIYer with professional support where required. Many phases, such as preparation and pipe installation, can be completed by following the manufacturer’s instructions. Certain stages are best left to professionals, including connection to the heat source, screed installation, and all electrical work
All wet UFH installations follow a similar process, with specific methods used to hold pipes in place. If installing your own system, ensure you fully understand the process and seek professional help where required.
If you need any advice, please get in touch. Visit our manuals page for further installation details and best practices.